


There are two ways to get a garden glowing after dark. The full version is a proper low-voltage lighting system: buried cable, a transformer, and individual fixtures picked and placed one by one. It looks brilliant and you control every beam, but it is a genuine weekend project with a shopping list to match.
The other way takes about five minutes and one power point.
This guide covers both. Most of it walks you through the wired install step by step (planning, tools, positioning, wiring, testing and upkeep) because if you want precise, permanent lighting, it is worth doing properly. But the shortcut comes first, because for plenty of Aussie backyards it is all you need.
The no-dig, no-wire shortcut: laser projectors
Before you commit a weekend, it is worth being clear about what a full install involves. A wired low-voltage system means trenching cable around the yard, mounting and connecting a transformer, then positioning, aiming and adjusting a dozen or more separate fixtures. Depending on the size of the garden, you are looking at several hundred dollars in fixtures, cable and a decent transformer, plus a solid weekend of digging, before anything lights up.
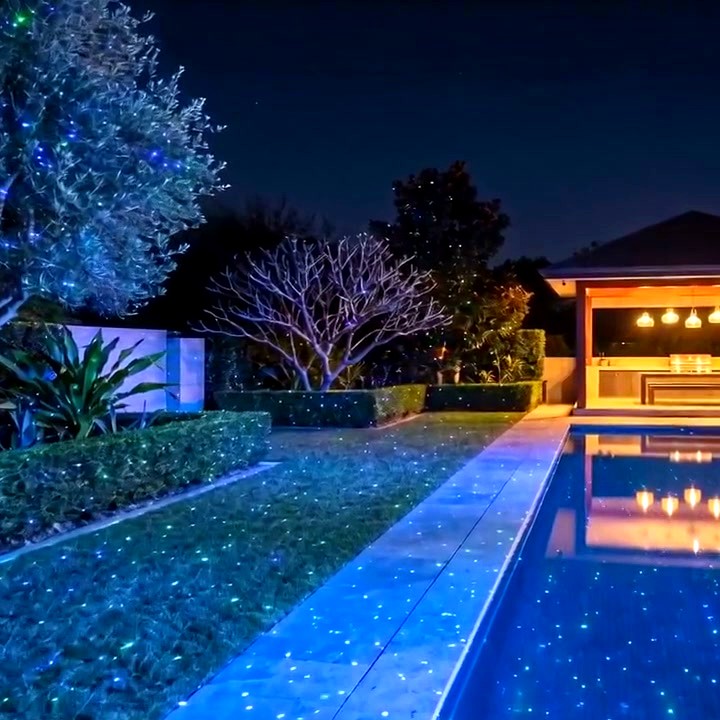
A garden laser projector skips nearly all of that. You push a single spike into a garden bed, plug it into an outdoor power point, and it throws thousands of green and blue points of light across your trees, hedges, fence line and lawn. No trenches, no cable runs, no transformer maths. Setup takes about five minutes.
The one we sell is the HighBright garden laser projector, currently $275 (down from $349). It is IP65 weatherproof so it stays outside year-round, it projects green and blue stars rather than one flat colour, and it has a throw of 40m+, so a single unit in a back corner can cover an average suburban yard on its own. It sits at 4.9 stars across 287 Australian reviews, from an Australian-owned shop with stock in QLD and a 12-month warranty.

It suits some situations especially well. Renters, since nothing is permanently installed and it moves house with you. Big or sloped blocks, where trenching cable is genuinely hard work. And anyone who mainly wants the yard looking special for entertaining, parties and the Christmas season without a project attached. Plug it in when the sun goes down and the whole garden is done.
To be fair to both options: a projector gives you a starfield across everything in its path, not aimed task lighting. It will not uplight one feature tree or mark the edge of each step on the back stairs. If you want that kind of precision, the wired install below is how you get it. Plenty of people end up running both: the laser for whole-yard atmosphere, plus a few wired path lights where footing matters.
Step 1: Plan your lighting layout
Good landscape lighting starts on paper, not in the trench. Walk the yard after dark with a torch and note three things: the features worth showing off (a feature tree, a nice stone wall, the pond), the spots that need light for safety (steps, path edges, dark corners near doors), and the areas you actually use at night, like the deck or the fire pit.
Then think about conditions. Fixtures in exposed spots need proper weather sealing, and anything that relies on a solar panel will struggle under dense canopy, so shaded areas are better served by wired fixtures. For entry points and dark side paths, motion-activated fixtures earn their keep on security alone and cost nothing while they sit idle.
It also helps to know the four classic techniques the pros lean on. Uplighting puts a spotlight at the base of a tree or wall, aimed up, for instant drama. Silhouetting places the light behind a plant and washes the wall behind it, so the plant reads as a dark shape. Grazing mounts the light close to a textured surface like stone or brick and skims the beam across it. And moonlighting mounts a downlight high in a tree so a soft, dappled pool of light falls through the branches. Even using just one or two of these lifts a garden well beyond the standard row of hardware-store path lights.
Choosing types and styles
Match the fixture to the job. Floodlights and high-output LEDs suit big open areas and security zones. Softer, warm LEDs suit seating and entertaining spaces. Path lights handle walkways, and small spotlights at the base of a tree give you that resort-style uplighting effect.
Colour temperature matters more than most people expect. Cooler white light (4000K and up) makes foliage look crisp and vivid, while warmer light (2700K to 3000K) feels cosy and welcoming near the house. Pick fixture styles to suit the garden as well: sleek and minimal for modern landscaping, lantern-style for cottage gardens.
Before you move on, your plan should cover:
- Which features to highlight and which zones need safety lighting
- Fixture types for each zone (flood, path, spot, motion)
- Colour temperature for each area
- Weather exposure and the IP rating each spot demands
- A rough fixture count, so you can size the cable and transformer

Step 2: Gather your tools and materials
Nothing kills a weekend project like a third trip to the hardware store, so get everything together before you start.
Tools first: a voltage tester, wire strippers, a screwdriver set, a spade or trenching shovel for the cable runs, and a ladder if any fixtures mount up high. Gloves and safety glasses go without saying, and a multimeter is handy for chasing down connection problems later.
Then materials: your fixtures, low-voltage garden cable sized for the run length, weatherproof wire connectors (the gel-filled type is worth the extra few dollars), a low-voltage transformer, conduit for anywhere the cable crosses a path, and a timer or dusk sensor so the system runs itself.
On cable quantity, do not guess. Walk each planned run with a tape measure or a length of string, add the runs together, then add 10 to 15 per cent for slack loops and the odd detour around a root. Running out of cable two-thirds of the way through a trench is a special kind of frustrating.
Buy quality where it counts
Outdoor fixtures live a hard life. Prioritise waterproof housings with a genuine IP rating, LED bulbs over halogen (they run cooler, cost less to run and last years longer), and fittings with replaceable parts. Check that any timer or smart plug is rated for outdoor use, not just the laundry.
- Voltage tester, wire strippers, spade, ladder, gloves and glasses
- Low-voltage cable, weatherproof connectors, conduit
- Transformer sized with headroom (more on that below)
- LED fixtures with genuine IP ratings
- Timer or dusk-to-dawn sensor rated for outdoors
A quick safety note before any wiring
In Australia, all 240V mains electrical work must be done by a licensed electrician. That is the law in every state and territory. It covers new outdoor power points, hardwiring fixtures to the mains, and anything inside the switchboard.
What you can legally DIY is the low-voltage side: 12V garden lighting running off a plug-in transformer, solar fixtures, and anything that simply plugs into an existing outdoor outlet. If your plan needs a new outdoor power point, book the sparkie first and build around it, and while they are there, have them confirm the circuit is RCD-protected.
Step 3: Position and secure your fixtures
Set every fixture out on the lawn in its planned position before you dig or fix anything. Then, after dark, run an extension lead around and test the look one fixture at a time. Ten minutes of testing saves hours of re-trenching.
A few positioning rules that hold up:
- Uplights sit at the base of trees and walls, angled up and slightly across the surface to bring out texture
- Path lights work best staggered on alternating sides of the walkway, roughly 2 to 3 metres apart, not lined up like a runway
- Motion-activated fixtures belong at entries, gates and dark corners
- Angle every beam away from windows, seating areas and the neighbours
Once you are happy with the layout, fix everything down properly. Follow the manufacturer's mounting instructions, use outdoor-rated stainless or galvanised screws and anchors, and seat ground spikes deep enough that a knock from the mower or a stray football cannot throw the aim out. For solar fixtures, face the panel north where it gets real sun most of the day, and run a bead of weatherproof sealant around wall-mount points so water cannot track into the fixing holes.
Step 4: Lay out and connect the wiring
Map your cable runs before you cut anything. Follow garden bed edges and fence lines rather than crossing open lawn, keep runs clear of spots you dig or aerate regularly, and keep the route back to the transformer as short as practical. Long runs lose voltage, and the fixtures at the far end will run dim.
Bury low-voltage cable at least 150mm deep so it sits safely below aerating and edging depth. Anywhere it crosses a path or driveway, sleeve it in conduit. Leave a slack loop at every fixture so you can reposition or replace it later without splicing in new cable.
Connecting to power
The transformer is the heart of a low-voltage system. Mount it in a sheltered spot near the outdoor power point, up off the ground, and plug it in rather than hardwiring it (hardwiring is electrician territory, as above). Add up the wattage of every fixture on the circuit and keep the total under about 80% of the transformer's rating, so it is not working flat out every night of its life.
If the layout allows it, run two or three shorter cable runs out from the transformer in different directions instead of one long loop around the whole yard. Shorter runs mean less voltage drop, more even brightness between the first fixture and the last, and an easier time finding faults later because each run can be tested on its own. Heavier-gauge cable also drops less voltage, so if a long run is unavoidable, size the cable up.
Use proper weatherproof connectors on every joint. Twist-and-tape does not survive a Queensland summer storm, let alone years in damp soil. For far corners of the block where running cable is not practical, a quality solar fixture is the sensible compromise, just accept it will run dimmer through winter and after cloudy days.
Step 5: Test and adjust
Switch everything on at dusk and walk the whole yard. You are looking for fixtures that flicker (usually a loose or corroded connection), fixtures noticeably dimmer than their mates (voltage drop at the end of a long run), and beams landing where they should not, like straight through the lounge room window.
Test the timer or dusk sensor across a couple of evenings, and if anything runs through an app, confirm the schedules actually do what they claim. Give solar fixtures a few nights before judging them, because performance swings with the weather.
Then fine-tune. Adjust angles to even out bright and dark patches, aim wall-wash beams across the surface rather than square-on so the texture shows, and pull back any fixtures whose beams overlap into a hotspot. You are after layers of light with soft edges, not a floodlit car yard.
One last check most people skip: look at the garden from inside the house. The view from the kitchen window and the couch is the one you will see most nights, so it is worth adjusting a fixture or two purely for that angle.
Step 6: Maintain the system
Landscape lighting is low-maintenance, not no-maintenance. A quick walk-around once a month keeps it looking like the night you finished it:
- Wipe lenses and any solar panels with a damp cloth, because dirt and spider webs cost real brightness
- Check seals and gaskets, and replace any that look perished before water gets in
- Look for corrosion on connectors and contacts
- Trim plants that have grown across beams or shaded a solar panel
- Replace failed bulbs like for like, matching wattage and colour temperature
Twice a year, check the buried cable where it enters conduit and fixtures, and make sure the transformer's vents are clear. After a big storm, do a quick lap to straighten knocked fixtures and check nothing is sitting in standing water. Keep a rough note of anything you replace: if the same fixture keeps failing, the culprit is usually the connection or water getting in, not the bulb.
Landscape lighting FAQs
Do I need an electrician for garden lighting in Australia?
For anything 240V, yes. New outdoor power points and hardwired fixtures legally require a licensed electrician. Low-voltage 12V systems running off a plug-in transformer, solar lights and plug-in projectors are all fine to DIY.
How deep should low-voltage garden cable be buried?
Around 150mm is the practical standard, deep enough to clear aerating and edging. Sleeve it in conduit wherever it crosses a path or driveway, and leave a slack loop at each fixture for later adjustments.
How many lights can one transformer run?
Add up the wattage of every fixture and keep the total under about 80% of the transformer's rated capacity. If lights at the end of a long run look dim, the run is too long or the cable too thin, not necessarily the transformer too small.
What IP rating do outdoor lights need?
IP44 is the minimum for sheltered spots under eaves. Anything copping direct rain or sprinklers should be IP65, which is dust-tight and hose-proof. That is the rating the HighBright laser projector carries, which is why it can live outside year-round.
What is the fastest way to light a whole backyard?
A garden laser projector. One spike, one power point, about five minutes, and 40m+ of coverage across trees, fences and lawn. It is the option we point people to when a full wired install is more project than they are after.
THE WHOLE-YARD SHORTCUT
HighBright Garden Laser Projector
$349 $275
4.9 stars from 287 Australian reviews · Australian-owned · QLD stock · 12-month warranty
See the HighBright →IP65 weatherproof · Green + blue stars · 40m+ throw · One power point, five minutes

